Schedule Inspections
Propty helps you track SB 326 elevated element inspections — a California requirement for condominiums with balconies, decks, walkways, stairways, and other load-bearing structures six feet or more above ground. You can register elevated elements, record inspection results, and monitor hazard remediation deadlines.
- A property set up in Propty
- Details about the elevated elements at your property (location, type, material)
- Inspection reports from a licensed structural engineer or architect
Adding an Elevated Element
Before scheduling an inspection, register the element in your property.
1. Go to the Compliance dashboard
From your property dashboard, click Compliance in the left sidebar. You will see summary cards for Inspections, Violations, Collections, Insurance, Reserves, Disclosures, and ARC.
2. Click the Inspections card
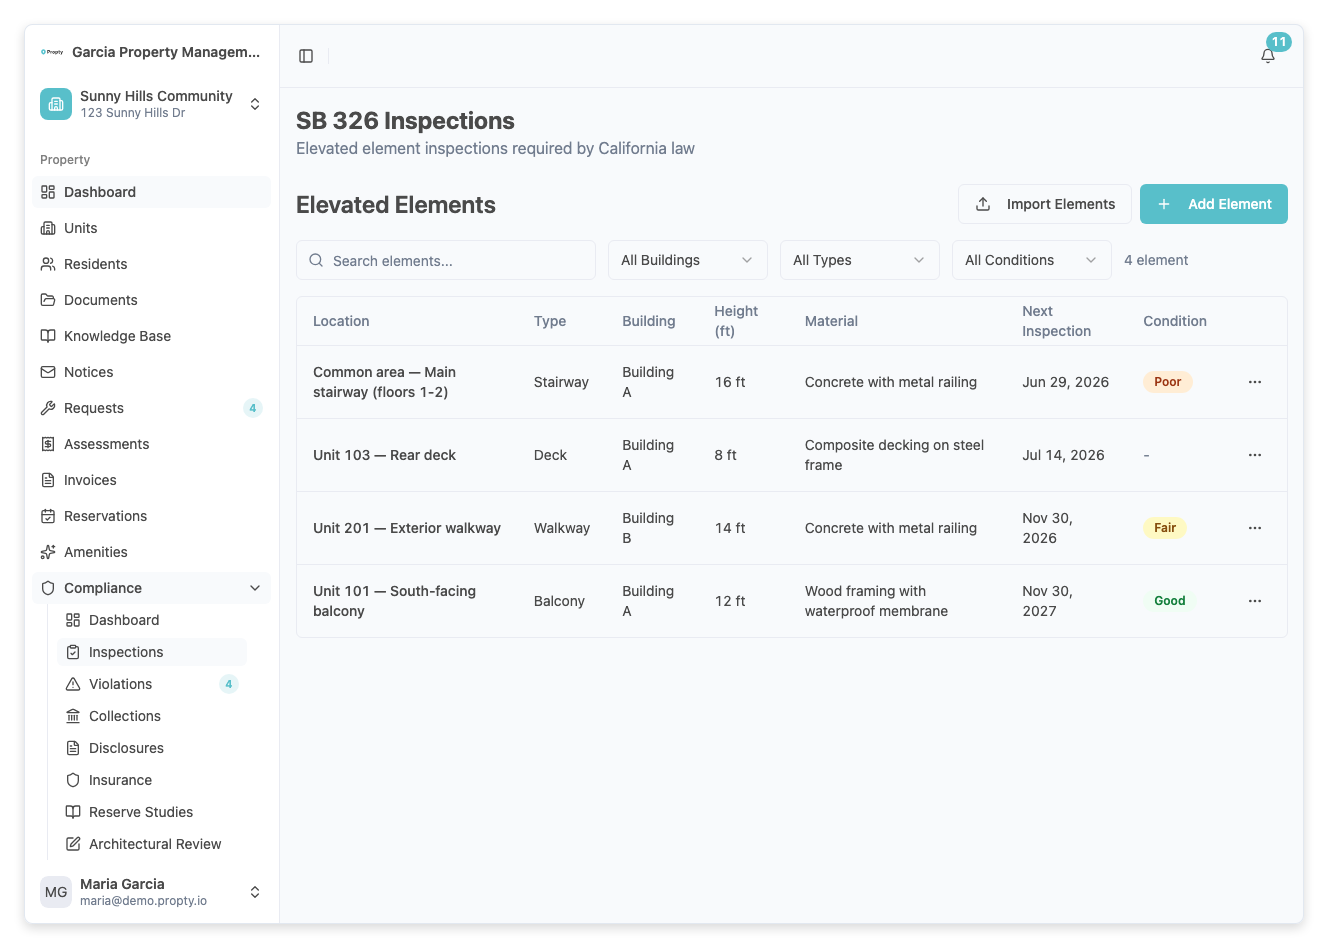
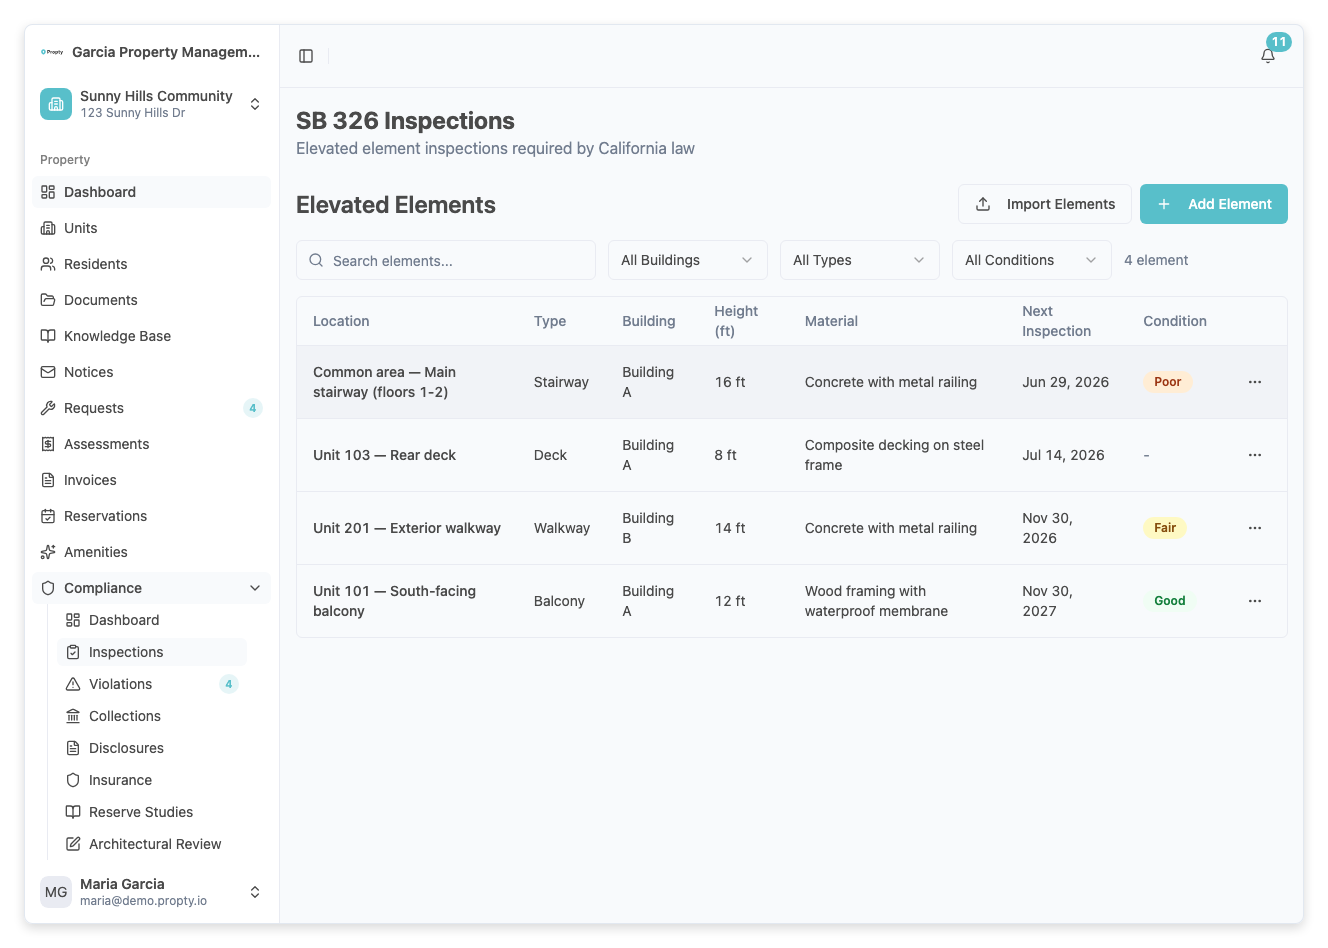
Click the Inspections card to open the inspections list. This page shows all registered elevated elements and their inspection status.
3. Click "Add Element"
Click the Add Element button. A form will appear asking for:
- Element Type (required) — Select one: Balcony, Deck, Walkway, Stairway, Landing, or Patio.
- Location (required) — Describe where the element is (for example, "Unit 101 - Front Balcony").
- Building (optional) — The building name or number, if your property has multiple buildings.
- Unit (optional) — Link the element to a specific unit.
- Height (feet) (required) — The height above ground. Must be 6 feet or more to fall under SB 326.
- Material (required) — Construction material (for example, "Wood", "Composite", "Concrete").
- Installed Year (optional) — When the element was originally installed.
- Next Inspection Due (required) — The date by which the next inspection must be completed.
4. Save the element
Click Save. The element now appears in your inspections list.
Recording an Inspection
1. Open the element detail
From the inspections list, click on the element you want to record an inspection for.
2. Click "Record Inspection"
Click the Record Inspection button. A form will appear with the following fields:
- Inspection Date (required) — The date the inspection was performed.
- Inspector Name (required) — The full name of the licensed inspector.
- License Number (required) — The inspector's professional license number.
- Inspector Type (required) — Select Structural Engineer or Architect.
- Condition (required) — The overall condition rating: Excellent, Good, Fair, Poor, or Critical.
- Hazard Found — Toggle on if a hazard was identified during the inspection.
3. If a hazard was found
When you toggle Hazard Found on, three additional required fields appear:
- Hazard Level — Minor, Moderate, Severe, or Immediate Danger.
- Hazard Description — Describe the hazard in detail.
- Repair Deadline — The date by which repairs must be completed.
You can also enter an Estimated Repair Cost (optional).
4. Attach documentation
- Report URL (optional) — Link to the full inspection report PDF.
- Photos (optional) — Upload photos of the inspected element.
- Notes (optional) — Any additional notes from the inspector or property manager.
5. Save the inspection
Click Save. The inspection is recorded and the element's status updates on the compliance dashboard.
Understanding Inspection Statuses
The Inspections summary card on the compliance dashboard shows one of the following:
| Status | Meaning |
|---|---|
| All Clear | All elements have current inspections with no hazards |
| Overdue | One or more elements have passed their next inspection due date |
| Hazards (N) | N elements have unresolved hazards requiring remediation |
| No Data | No elevated elements have been registered yet |
Hazard Levels
| Level | Description |
|---|---|
| Minor | Cosmetic or non-structural issue; no immediate risk |
| Moderate | Structural concern; should be repaired within deadline |
| Severe | Significant structural damage; urgent repair needed |
| Immediate Danger | Unsafe for use; must be closed off and repaired immediately |
Troubleshooting
I don't see the Inspections card on the compliance dashboard
- Make sure you have the correct permissions for your property.
- The compliance dashboard is available under Compliance in the left sidebar.
The inspector type I need is not listed
- Propty supports Structural Engineer and Architect as inspector types, per SB 326 requirements. Other inspector types are not eligible for SB 326 inspections.
I need to update an inspection after saving
- Open the element detail and click the inspection in the history list. You can edit the inspection details or add additional notes and photos.
How do I know when inspections are due?
- The compliance dashboard shows a warning when inspections are overdue. You can also check the Next Inspection Due date on each element.
Recording Hazards
When an inspection uncovers a structural problem or safety issue, you can record it as a hazard. Hazards are tracked separately from the inspection result and drive follow-up remediation deadlines.
1. Open the inspection record
From the Inspections page, click on the element whose inspection contains a hazard. Click the Edit button on that inspection in the history.
2. Click "Record Hazard"
In the inspection detail, click the Record Hazard button. A form appears.
3. Enter hazard details
Fill in the following fields:
- Hazard Description (required) — Describe the specific problem found (for example, "Deck railing is loose and rotting; wood deterioration extends 3 inches").
- Hazard Level (required) — Rate the severity:
- Minor — Cosmetic or non-structural issue; no immediate risk
- Moderate — Structural concern; should be repaired within reasonable timeframe
- Serious — Significant structural damage; urgent repair needed
- Imminent — Unsafe for use; must be addressed immediately
- Estimated Repair Cost (optional) — Rough estimate of cost to repair
- Repair Deadline (required) — The date by which the repair must be completed
4. Save the hazard
Click Save. The hazard is recorded and the element's status updates to show that hazards are present.
Imminent Hazard Handling
If you record a hazard as Imminent:
- Board notification — The board is automatically notified about the imminent hazard.
- Closure requirement — The element must be closed off or restricted from use until repaired.
- Remediation deadline — Set an aggressive deadline (for example, within 2 weeks) for repairs to be completed.
- Document the fix — Once repairs are done, update the hazard status to Resolved with documentation of the repair work.
Understanding the 5% Sample Rule
California Senate Bill 326 (SB 326) requires associations with 3 or more buildings to inspect a statistically significant random sample of elevated elements, rather than 100% of all elements. This 5% minimum sample rule helps balance inspection costs with safety.
How the 5% rule works
If your property has:
- 3-5 buildings → Inspect a minimum of 5% of each building type
- 6+ buildings → Inspect a minimum of 5% per building type, with additional statistical requirements
Example:
- 10-story building with 200 balconies
- 5% sample = 10 balconies minimum
- You select a random sample of 10 balconies to inspect each cycle
Viewing your sample calculation
Propty calculates your required sample size automatically:
- Go to Compliance → Inspections.
- Look for the Elevated Elements or Sample Summary section.
- You'll see:
- Total Elements — All elevated elements at your property
- Required Sample Size — Minimum elements that must be inspected (5% or per SB 326 rules)
- Inspected This Cycle — How many you've already inspected
- Remaining — How many more inspections you need to complete this cycle
Selecting your random sample
You can either:
- Let Propty select randomly — The system can generate a random list of elements to inspect.
- Manually select — You choose which elements to inspect, being sure to include a diverse mix across all buildings and types.
Whatever method you use, document that your sample was selected randomly (or justify it if not random) for compliance purposes.
Documenting compliance with SB 326
Keep records showing:
- How many elements exist at your property
- How you calculated the 5% sample
- Which elements you selected and why
- Inspection dates and results
- Board minutes approving the inspection plan
Share these records with your structural engineer and board at annual compliance reviews.
Hazard Resolution Tracking
Once a hazard is recorded, track its resolution:
1. Open the hazard record
From Inspections, click the element with the hazard.
2. Add resolution updates
As repairs progress, add notes:
- "Board authorized repair contract on 3/20"
- "Repairs completed by contractor on 4/10"
- "Final inspection passed; hazard resolved"
3. Mark hazard as resolved
Once repairs are complete and verified:
- Update the hazard status to Resolved
- Record the resolution date
- Add documentation (contractor invoice, final inspection report, etc.)
4. Board review
The board should review and formally acknowledge hazard resolutions, especially for serious or imminent hazards. Record this approval in board meeting minutes.