Manage Maintenance Requests
The Requests page is your central hub for managing all maintenance requests submitted by residents. You can view, filter, assign, prioritize, and respond to requests.
- A Propty account with Property Manager, Property Admin, or Team Member access
Viewing all requests
1. Go to the Requests page
From your property dashboard, click Requests in the left sidebar.
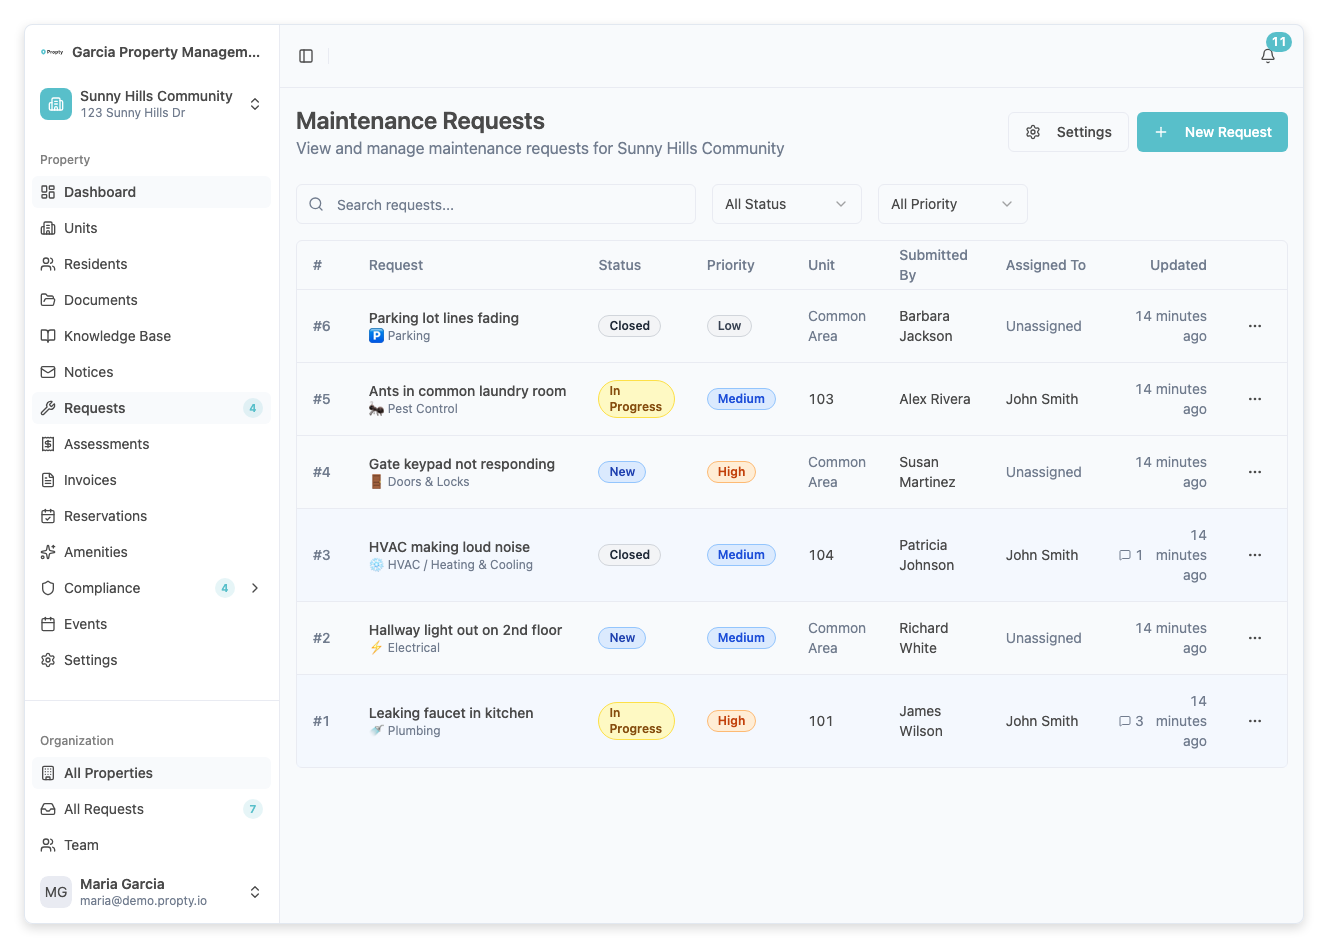
2. Filter and search
Use the filter bar at the top to narrow down requests:
- Search — type keywords to find requests by title or description
- Status — filter by New, In Progress, Pending, or Closed
- Priority — filter by Urgent, High, Medium, or Low
Click Clear Filters to reset all filters.
3. Review the request table
Each row shows:
| Column | Description |
|---|---|
| # | Request number |
| Title | Short description of the issue |
| Unit | The unit where the issue is located |
| Category | The type of issue (Plumbing, Electrical, etc.) |
| Priority | Urgency level (color-coded badge) |
| Status | Current state of the request |
| Assigned | Team member handling the request |
| Created | When the request was submitted |
Managing a single request
1. Open the request
Click on any row in the request table to open the full detail page.
The detail page has three sections:
- Description — the resident's original description of the issue
- Activity — timeline of all messages and status changes
- Sidebar — status, priority, assignment, and request details
2. Change the status
In the sidebar, use the Status dropdown to update the request status:
| Status | When to use |
|---|---|
| New | Just received, not yet reviewed |
| In Progress | Being actively worked on |
| Pending | Waiting for parts, scheduling, or resident response |
| Closed | Issue has been resolved |
3. Set the priority
Use the Priority dropdown in the sidebar to set the urgency level:
- Urgent — safety hazards, water leaks, no heat/AC
- High — significant issue affecting daily living
- Medium — non-urgent repair needed
- Low — cosmetic or minor issue
4. Assign a team member
Use the Assignment dropdown in the sidebar to assign the request to a team member. Select Unassigned to remove the assignment.
5. Reply to the resident
In the Reply section below the activity timeline, type your message and click Send. The resident will be notified.
You can also:
- Use a canned response — click the canned response picker to insert a pre-written message (see Create Quick Responses)
- Mark as internal note — check the Internal note checkbox to add a note visible only to staff members
- Attach files — use the attachment uploader to share documents or photos
6. Configure request settings
In the sidebar Settings section, you can:
- Disable auto-close — toggle the switch to prevent this request from being automatically closed after inactivity
- Notification scope — choose who receives notifications about this request (all unit residents, owners only, tenants only, or no one)
Troubleshooting
I can't change the status or priority
- The request may be Closed. Reopen it by changing the status to a different value.
- Verify you have the correct permissions for your role.
The resident is not receiving notifications
- Check the Notification scope setting in the sidebar. It may be set to "No one (internal only)".
- Verify the resident has a valid email address.
I need to close multiple requests at once
- Currently, requests must be closed individually from their detail pages. Use the status filter to find all requests that need closing.